自己实现对接OAuth2单点登录系统
自己实现对接OAuth2单点登录系统
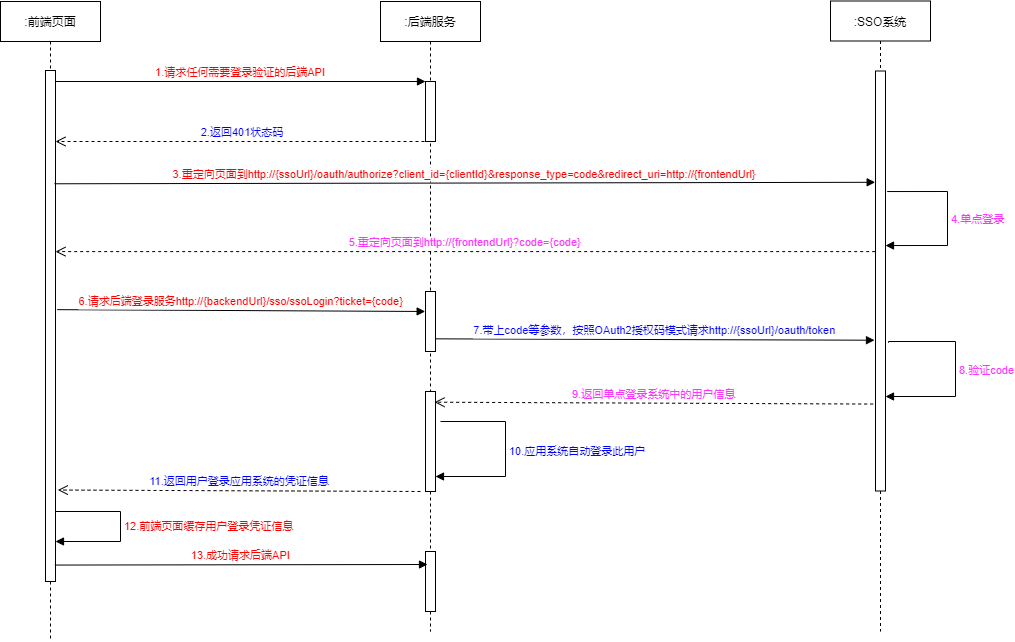
OAuth2单点登录对接的时序图如下所示:
1.OAuth2单点登录处理流程
前端页面处理流程步骤为:
图上的1,3,6,12红色字体的流程步骤。
前端需要相应代码来处理。
后端服务处理流程步骤:
图上2,7,10,11蓝色字体的流程步骤。
后端需要相应代码来处理。
OAuth2处理流程步骤:
图上4,5,8,9紫色字体的流程步骤。单点登录系统自己处理。
1.1.自己要实现对接OAuth2单点登录系统,就需要按上图所示实现对应的前端和后端代码改造。
图上第7点后端需要实现的示例代码如下:
1
2
3
4
5
6
7
8
9
10
11
12
13
14
15
16
17
18
19
20
21
22
23
24
25
26
27
28
29
30
31
32
33
34
35
36
37
38
39
40
41
42
43
44
45
46
47
48
49
50
51
52
53
54
55
56
57
58
59
60
61
62
63
64
65
66
67
68
69
70
71
72
73
74
75
76
77
78
79
80
81
82
83
84
85
86
87
88
@PostMapping(value = "/ssoLogin")
public User ssoLogin(@RequestParam String code) throws JsonProcessingException {
  // 通过code获取access token
  String accessToken = oauth2ValidateCode(code);
  // 通过access token获取登录用户账号
  String userAccount = oauth2GetUser(accessToken);

  // 从OAuth2单点登录系统验证成功后需要再自动登录本系统
  User user = autoLogin(userAccount);
  return user;
}

/**
 * 通过code获取access token
 *
 * @param code
 * @return
 * @throws JsonProcessingException
 */
public String oauth2ValidateCode(String code) throws JsonProcessingException {
  String result = null;
  RestTemplateBuilder restTemplateBuilder = new RestTemplateBuilder();
  RestTemplate restTemplate = restTemplateBuilder.build();
  // 接口参数
  MultiValueMap<String, String> params = new LinkedMultiValueMap<>();
  params.add("client_id", client_id);
  params.add("client_secret", client_secret);
  params.add("grant_type", "authorization_code");
  params.add("code", code);
  params.add("redirect_uri", redirect_uri);

  // 头部类型
  HttpHeaders headers = new HttpHeaders();
  headers.setContentType(MediaType.APPLICATION_FORM_URLENCODED);

  // http实体
  HttpEntity<MultiValueMap<String, Object>> entity = new HttpEntity(params, headers);
  ResponseEntity<String> response = restTemplate.postForEntity(oauth2Url, entity, String.class);
  ObjectMapper jsonMapper = new ObjectMapper();
  String body = response.getBody();
  JsonNode root = jsonMapper.readTree(body);
  // code验证成功就会返回access_token
  JsonNode tokenNode = root.findValue("access_token");
  if (tokenNode != null) {
    String access_token = tokenNode.asText();
    log.debug("#################################### OAuth2 access_token: " + access_token);
    result = access_token;
  } else {
    throw new BusinessException("OAuth2单点登录验证失败:" + body);
  }
  return result;
}

/**
 * 通过access token获取登录用户账号
 *
 * @param accessToken
 * @return
 * @throws JsonProcessingException
 */
public String oauth2GetUser(String accessToken) throws JsonProcessingException {
  String result = null;
  RestTemplateBuilder restTemplateBuilder = new RestTemplateBuilder();
  RestTemplate restTemplate = restTemplateBuilder.build();

  // 头部类型
  HttpHeaders headers = new HttpHeaders();
  headers.setContentType(MediaType.APPLICATION_FORM_URLENCODED);
  headers.set("Authorization", "Bearer " + accessToken);

  // http实体
  HttpEntity<MultiValueMap<String, Object>> entity = new HttpEntity(null, headers);
  ResponseEntity<String> response =
      restTemplate.exchange(userinfoUrl, HttpMethod.GET, entity, String.class);
  ObjectMapper jsonMapper = new ObjectMapper();
  String body = response.getBody();
  JsonNode root = jsonMapper.readTree(body);
  // 接口会返回登录用户相关信息
  JsonNode userNode = root.findValue("user");
  if (userNode != null) {
    String user = userNode.asText();
    log.debug("#################################### OAuth2 login user: " + user);
    result = user;
  } else {
    throw new BusinessException("OAuth2单点登录获取用户信息失败:" + body);
  }
  return result;
}
注意:
oauth2Url是授权服务器中的code认证API,形如:
http://ip:port/services/authorization/oauth/token
userinfoUrl是资源服务器中的获取登录用户信息的API,形如:
http://ip:port/services/resource/user/getUserInfo
1.2.除了完成对接OAuth2的认证流程,还需要从单点登录系统中定时拉取组织和用户信息到自己系统中
现在OAuth2单点登录系统中的组织和用户信息API只支持查询全量数据。
组织GET API URL示例如下:
http://ip:port/services/admin/api/open/sync/listOrg
请求组织的url返回的信息字段:
| 字段名称 | 字段描述 | 备注 |
|---|---|---|
| id | 唯一标识 | |
| name | 组织名称 | |
| type | 组织类型:公司、子公司、单位、部门等 | |
| parentId | 父组织ID | |
| sort | 排序编号 |
用户GET API URL示例如下:
http://ip:port/services/admin/api/open/sync/listUser
请求用户的url返回的信息字段:
| 字段名称 | 字段描述 | 备注 |
|---|---|---|
| id | 唯一标识 | |
| account | 账号名 | |
| realName | 实名 | |
| orgId | 用户组织 |
2.单点登出:
第三方系统登出时直接重定向到统一的单点登出URL即可,形如:
http://ip:port/services/authorization/oauth/logout
本文由作者按照
CC BY 4.0
进行授权